Unmounted filter adapters
31 mm to 2" and 36 mm to 2" threaded
In this article, I present instructions for making adapters that allow the use of unmounted 31 mm and 36 mm filters in slots for 2" threaded filters.
Table of contents
Files
All files for 3D printing have been packed into a single archive, which you can download here:
- FA-36_31_2.zip - 3MF files set both, 31 mm and 36 mm, filter adapters.
Components
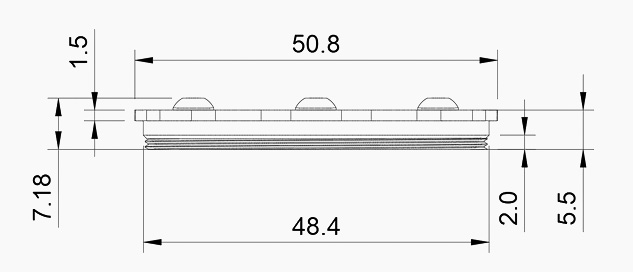
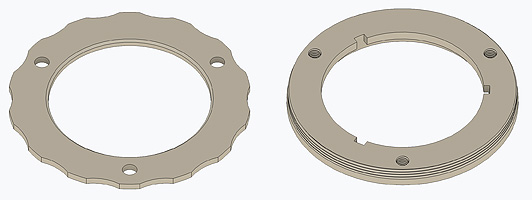
Each adapter consists of two separate parts: a threaded bottom part and a flat top part.
The components should be printed in the orientation shown in the above drawings, without using any supports. They should have a layer height of 0.1 mm, except for the first layer, which should be 0.2 mm. Everything need to be made from well-dried PETG+CF filament.
General information on preparing for printing, the printing process, and its completion, including information on the required filament, printing speeds, and other technical parameters, is provided in a separate article. Before you continue, make sure you have read it and understood all the information it contains. Only by following all the instructions there will you be able to be sure that the device will work properly.
Additional materials
The upper and lower parts should be screwed together with three M3x4 ball head screws. If you have several unmounted filters and want to use them alternately, it is worth printing separate parts for each of them so that you do not have to unscrew the adapter each time you change the filter.
Therefore, to complete the drawer, it is worth purchasing a few additional materials and taking a moment to properly finish the freshly printed parts. This process will significantly increase the comfort and safety of using the filter drawer. The cost of these additional parts should not exceed a few dollars.
Bill of materials:
-
M3x4 ball head screws (Φ 3.0 mm, L=4 mm, metric thread, ISO 7380)
- 3 pcs for cthe adapter,

Assembly
-
After printing, check that everything went well and that there are no folds, blobs, zits, or other printing errors. The surfaces should be smooth, even, and free of any minor imperfections before further assembly.
-
Insert the unmounted filter into the bottom part of the adapter and screw the top part on with M3x4 screws.
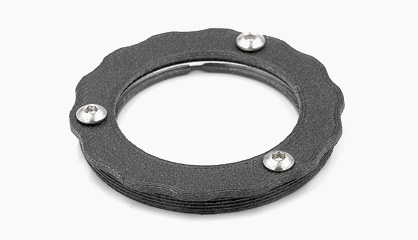
Fig.4 - Assembled adapter with filter installed If you have a metal filter drawer, metal filter wheel, or other device with a metal threaded socket for 2" filters, screw the adapter into it several times. This will smooth the surface of the plastic printed thread, making it slightly easier to screw in each time.
Note: Never force the adapter, as you may damage the printed thread or jam the adapter in the socket. Screw the adapter in gently, evenly, and slowly. Especially the first time, you must pay special attention to performing the screwing operation with due care.
-
If you want to remove the filter from the adapter, unscrew it and push the filter out from the bottom. Push it with a stiff but soft object (e.g., a wooden toothpick) at the edges, placing the tool in the rectangular cutouts at the bottom of the adapter.